

Climate-controlled self-storage is becoming essential in the competitive storage industry. These units protect sensitive items from extreme temperatures and humidity, adding value to your storage facility and attracting a broader customer base.
If you’re researching how to build climate controlled storage units, the goal is simple: create an interior environment that stays stable through seasonal swings, daily heat gain, and high-humidity days. The “right” approach isn’t one feature—it’s a system where the building envelope, mechanicals, and moisture management work together.
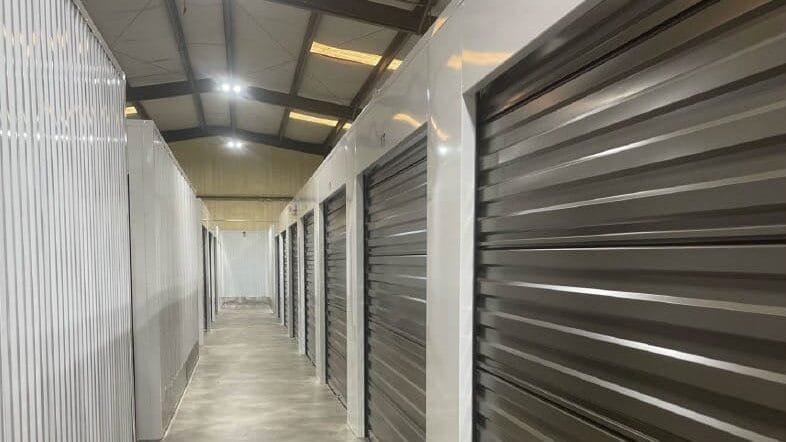
Understanding the Basics of Temperature Controlled Self Storage Facilities
Climate-Controlled vs. Temperature-Controlled: Know What You Are Building
Before going further, it is important to clarify terminology the industry often uses loosely. “Climate-controlled” means the facility regulates both temperature and humidity. “Temperature-controlled” means the facility provides heating and air conditioning only, with no active humidity management.
The distinction affects your construction scope and your liability. A climate-controlled building needs a dehumidification system in addition to standard HVAC, plus a tighter building envelope to manage moisture. If you advertise climate-controlled storage but only provide temperature regulation, tenants whose belongings suffer humidity damage may have a legitimate complaint. Be precise in what you build and what you promise.
The industry standard target for climate-controlled storage is 55°F to 85°F with relative humidity below 55 to 65 percent. Note that the goal is not 72°F year-round. That is a human comfort standard for occupied spaces. Storage facilities do not need to maintain office-level temperatures, and doing so wastes energy and increases operating costs unnecessarily.
The Essentials of Climate-Controlled Storage
Climate-controlled storage units maintain specific temperature and humidity levels to protect stored items from environmental damage. For self-storage operators, climate control expands who you can serve, from families storing household goods to businesses protecting inventory, records, and equipment.
A strong plan focuses on consistency, not perfection. When your building reduces temperature spikes and humidity swings, you protect tenant belongings, reduce odor and moisture complaints, and create a cleaner experience that helps your facility stand out.
Climate-controlled units typically command 15 to 30 percent higher rental rates than standard drive-up units of the same size, which means the added construction cost often pays for itself through stronger revenue per square foot.
Planning Your Build
Designing Climate-Controlled Facilities
Start your climate controlled self storage building plans by deciding what type of facility you’re building: interior corridor units, mixed-use (standard + climate), or a dedicated climate-controlled building. That decision impacts everything from wall assemblies and doors to HVAC sizing and energy use.
Next, map out operational flow. Where do customers enter, where do they unload, and how will they move through the building? Designating clear corridors, wider turn areas, and a mechanical/equipment zone early prevents expensive rework later.
What to Decide Before You Draw Plans
Before finalizing your layout, lock in the details that influence performance and usability. Think about ceiling height, the total cubic volume you must condition, and where outside air can sneak in through doors or penetrations.
Key planning choices often include:
- Unit mix and corridor width for easy move-ins
- A dedicated mechanical room with service access
- Door and vestibule strategy to reduce hot/humid air intrusion
- Electrical capacity for HVAC, lighting, and security systems
- Drainage and site grading to keep moisture away from the slab
For more on corridor widths, unit placement, and building width options for climate-controlled layouts, see our guide on mini storage building floor plans.

Technology and Systems
Building Envelope Fundamentals: Insulation for Climate-Controlled Storage
Insulation is the foundation of every climate-controlled storage building. Without adequate insulation, your HVAC system works harder, your energy costs climb, and your ability to maintain stable temperature and humidity conditions degrades.
Minimum Insulation Values
The industry standard minimum is R-19 (6-inch fiberglass batts) for both walls and roof. Many developers in extreme climates go higher, using R-25 or R-30 in the roof to account for direct solar heat gain. Current IECC (International Energy Conservation Code) commercial insulation requirements vary by climate zone, so check your local adopted code version before finalizing your insulation specification.
Insulation Types: Spray Foam vs. Fiberglass vs. Rigid Board
Fiberglass batts (vinyl-backed) are the most common insulation choice for pre-engineered steel storage buildings because they are cost-effective, readily available, and can be factory-installed on the roof and wall panels. TruSteel offers vinyl-backed insulation in both white and black options, with common configurations of 6-inch R-19 in the roof and 4-inch R-13 in the walls.
Closed-cell spray foam provides a higher R-value per inch (roughly R-6.5 per inch versus R-3.2 for fiberglass) and doubles as both insulation and vapor barrier. It is more expensive to install, but it eliminates thermal bridging at girt and purlin locations and creates a seamless air barrier. Spray foam is a strong choice for facilities in hot and humid climates where condensation control is a primary concern.
Rigid board insulation (polyiso or XPS) can be used as a continuous insulation layer over the exterior of the steel framing to break thermal bridges. It is less common in self-storage than in commercial office or retail construction, but it has applications in high-performance envelope designs where code or climate demand it.
Vapor Barrier Placement
Vapor barrier placement is critical in metal buildings, and getting it wrong is one of the most common construction mistakes in climate-controlled storage. The vapor barrier must be on the warm side of the insulation to prevent moisture-laden air from reaching the cooler metal panel surface, where it would condense.
In cooling-dominated climates (most of the Southeast and Southern United States), the warm side is the exterior, so the vapor barrier goes on the outside face of the insulation. In heating-dominated climates, the warm side is the interior. In mixed climates, consult your mechanical engineer, because incorrect placement creates condensation inside the wall assembly that can lead to corrosion, mold, and insulation failure.
HVAC Sizing and System Selection for Storage Units
HVAC is the engine that makes climate-controlled storage possible, but the building must support it. A high-efficiency system helps regulate temperature while also managing moisture, especially when units are opened regularly during busy seasons.
Climate-controlled storage requires significantly less cooling capacity than occupied commercial spaces. The general sizing guideline is roughly 1 ton of air conditioning per 1,250 to 1,600 square feet, compared to 1 ton per 450 to 600 square feet for offices. Storage facilities have lower internal heat loads (no people, no computers, no cooking equipment), which means smaller, more efficient systems can maintain the target temperature range.
The most common system types for climate-controlled storage are split systems (outdoor condenser paired with an indoor air handler), packaged rooftop units, and heat pumps. Heat pumps are increasingly popular because they provide both heating and cooling in a single unit and operate more efficiently than electric resistance heat in moderate climates. Current DOE minimum efficiency standards require a SEER2 rating of 15.0 or higher for most commercial split systems. Specifying equipment that exceeds the minimum by 1 to 2 SEER points can reduce long-term operating costs meaningfully on larger facilities.
For most facilities, zoning is the difference between “good enough” and “great.” Zoning lets you condition high-traffic areas more aggressively while maintaining stable conditions throughout the unit corridors, helping comfort and efficiency at the same time.
Ventilation and Air Movement That Actually Works
Climate control isn’t just heating and cooling—it’s controlled air movement. Balanced supply and return placement helps avoid hot spots, stagnant corners, and uneven humidity levels that can lead to condensation or musty odors.
Plan for monitoring and maintenance access, too. Filters, drains, and equipment components should be reachable without disrupting tenant areas, so routine upkeep stays simple.
The Dehumidification Question
Air conditioning provides some dehumidification as a byproduct of the cooling process, but in humid climates, AC alone is often not enough to maintain relative humidity below 55 to 65 percent. This is especially true during shoulder seasons when cooling loads are light but outdoor humidity remains high.
Central dehumidifiers integrated into the air handler system are increasingly standard in climate-controlled storage facilities, particularly in the Southeast, Gulf Coast, and Mid-Atlantic regions. These units (brands like Quest and Santa Fe are common in commercial storage applications) run independently of the cooling cycle and can maintain humidity targets even when the thermostat is not calling for cooling.
If you are building in a humid climate, budget for dedicated dehumidification from the start. Retrofitting it later is more expensive and less effective than designing it into the original HVAC system.
Construction Considerations
Building for Climate Control
If you want to know how to build climate controlled storage units that perform, focus on the envelope first. Walls, roof assemblies, doors, and air sealing determine how hard your HVAC must work and how stable the interior stays.
Choose insulation strategies that reduce thermal bridging and limit uncontrolled air leaks. Even small gaps can pull humid air inside, making moisture control harder and increasing run time for mechanical systems.
Air Sealing, Vapor Control, and Condensation Risk
A climate controlled steel building performs best when air and vapor movement are intentional. That means sealing penetrations, selecting appropriate vapor-retarding layers for your climate, and planning transitions at corners, openings, and roof-to-wall connections.
Condensation is often the first “symptom” of weak envelope planning. When warm, humid air meets cooler surfaces, moisture forms—so your design must reduce those conditions instead of reacting after the fact.
Moisture Control
Preventing Mold and Mildew
Humidity is the real challenge in many regions. Effective moisture control typically combines dehumidification, controlled ventilation, and smart site choices that keep water away from the building.
Operational habits matter, too. Frequent door openings, poor drainage, or unsealed penetrations can introduce moisture faster than systems can remove it, so construction details and daily use need to align.
Practical Moisture Strategies for Storage Operators
A few practical steps can reduce risk and improve tenant experience. Plan for condensate management, keep air moving in corridors, and ensure the slab and perimeter details discourage moisture migration.
Common moisture-control priorities include:
- Proper site grading and drainage away from the building
- Vapor protection under the slab and sealed floor transitions
- Dedicated dehumidification strategy for humid seasons
- Roof and wall details that reduce condensation potential
- Routine checks for leaks, clogged drains, and airflow restrictions
Cost Analysis
Understanding Climate-Controlled Self Storage Construction Costs
Climate-controlled buildings typically require more planning and more systems than standard drive-up storage. That can increase complexity up front, but it also creates a higher-quality product that can support stronger demand and longer tenant retention.
Climate-controlled self storage construction typically runs $65 to $75 or more per square foot (building package, slab, insulation, HVAC, interior buildout, and electrical), compared to $45 to $55 per square foot for single-story drive-up facilities. The premium covers insulation, vapor barriers, HVAC systems, dehumidification, interior liner panels, finished corridors, and the additional electrical capacity needed to power the mechanical systems.
Instead of chasing “cheap,” evaluate cost through lifecycle performance. Better insulation, tighter air sealing, and efficient equipment can reduce operating headaches and help the facility maintain stable conditions with less effort.
For a broader cost framework that covers all facility types, see our mini storage steel buildings guide.

Upgrading Existing Units
Retrofitting Climate Control into an Existing Storage Building
Adding climate control to an existing storage building or converting a warehouse or retail space into climate-controlled storage is a viable strategy, but it requires a systematic approach rather than simply installing an HVAC system.
Start by assessing the current insulation. If the building has no insulation or only minimal R-values, you will need to add wall and roof insulation before the HVAC system can maintain target conditions efficiently. Spray foam is often the best retrofit option because it conforms to existing framing and provides both insulation and air sealing in a single application.
Next, evaluate the building envelope for air leaks. Roll-up doors, loading dock openings, unsealed penetrations, and gaps at wall-to-roof transitions all allow conditioned air to escape and humid air to enter. Seal the envelope before sizing your HVAC system, because the mechanical equipment cannot compensate for a leaky building.
Size the HVAC and dehumidification system based on the sealed and insulated building volume, not the original uninsulated condition. Add dehumidification capacity if your climate warrants it. Finally, install humidity and temperature monitoring so you can verify that the system is maintaining your target conditions after the retrofit is complete.
For a detailed walkthrough of converting an existing building to storage, see our warehouse to self storage conversion guide.
Maximizing Your Investment
The Benefits of Climate-Controlled Storage
Climate control broadens your market and supports higher-value storage needs for customers who care about condition. It can also reduce seasonal churn by serving renters who want year-round confidence for sensitive items.
Most importantly, climate controlled self storage building plans help you build a facility with a stronger customer experience. When interiors feel clean, stable, and professional, you create trust—and trust is what keeps units occupied.
Ready to Build or Retrofit Climate-Controlled Storage?
TruSteel provides climate-controlled steel building kits engineered to your specific location and building code requirements. Every package includes county-specific stamped building and foundation plans, 100% steel construction, and a 30-year manufacturer’s warranty on panels and columns.
If you have a zip code, a target footprint, and an idea of your facility model, you have enough to get started. Contact TruSteel Buildings today for a free quote!