
Why Your Floor Plan Is the Foundation of a Profitable Facility
Your mini storage building floor plans determine how many units you can lease, how tenants access their belongings, how vehicles move through the site, and how efficiently you use every square foot of your parcel. A well-designed self storage floor plan maximizes rentable area while keeping traffic flow intuitive and code-compliant.
This guide explores the design standards behind the best layouts and explains why certain building widths, corridor dimensions, and unit depths work better than others.
Five Standard Mini Storage Floor Plan Types
Every self-storage facility uses one of five basic layout types, or a combination of them across multiple buildings on the same site. The layout you choose affects building width, roof style, unit depth, door placement, and construction cost.
Type 1
Single-slope with doors on one side
This is the simplest and most common mini storage layout for drive-up facilities. The building has a single-slope (mono-slope or shed-style) roof that pitches from front to back, with all roll-up doors on the high side of the building. Units are accessed from one side only.
Single-slope buildings work especially well along property edges and perimeter fencing because the windowless back wall can face the property line while the doors face inward toward the drive aisle. This configuration is a natural fit for the fortress layout (more on that below).
Typical building widths for single-slope layouts are 20 to 30 feet, accommodating unit depths of 10 to 25 feet plus wall thickness. The main advantage is simplicity: one row of units, one set of doors, one drive aisle per building. The trade-off is lower unit density per linear foot compared to back-to-back configurations.
When to use it: Property perimeters, narrow lots, smaller facilities, or any situation where you want simple operations and straightforward construction.
Type 2
Gable roof with equal back-to-back units
This layout uses a gable (peaked) roof with two rows of units placed back-to-back, sharing a common center wall. Each row of doors faces outward toward its own drive aisle. Both rows have equal unit depths.
A 40-foot-wide gable building is the most common configuration for this layout. It fits two rows of 10-foot-deep units placed back-to-back with wall thickness accounted for. A 30-foot-wide building works for two rows of shallow units (5-foot or 7.5-foot depths), while a 50-foot-wide building supports two rows of 15-foot-deep units.
This is the workhorse layout for suburban drive-up self-storage because it maximizes the number of units per building footprint. Every linear foot of building serves two rows of tenants rather than one.
When to use it: Standard suburban drive-up facilities where unit depths are consistent across both rows. Best for maximizing density on rectangular lots.
Type 3
Gable roof with non-equal back-to-back units
This layout is similar to the equal back-to-back configuration, but the two rows have different unit depths. For example, one side might have 10-foot-deep units while the other has 15-foot-deep units, creating a 40-to-45-foot-wide building depending on wall thickness.
Non-equal depths allow you to offer a wider range of mini storage unit dimensions in a single building without dedicating separate structures to different size categories. The deeper side accommodates larger units (10×15, 10×20) while the shallower side handles standard sizes (10×10, 5×10).
The trade-off is that the roof ridge is offset from the center of the building, which slightly complicates framing and drainage. Pre-engineered steel framing handles this easily because the building is custom-engineered to your exact width and unit depth combination.
When to use it: Facilities that need a diverse unit mix within a single building. Works well when your market demands a blend of standard and larger units but your lot does not support separate buildings for each size category.
Type 4
Custom layouts for irregular lots
Not every parcel is a clean rectangle. Triangular lots, lots with easements cutting through them, and properties with unusual setback requirements may need custom building footprints that do not fit standard single-slope or gable templates.
Custom layouts might include L-shaped buildings, staggered building rows at varying angles, or buildings with jogs and offsets that follow property boundaries. These layouts sacrifice some efficiency compared to straight rows, but they allow you to capture usable square footage on parcels that would otherwise be underbuildable.
Pre-engineered steel buildings are well-suited to custom configurations because the framing system is designed to your exact dimensions. Unlike tilt-up concrete, which becomes significantly more expensive with non-standard panel shapes, steel framing adapts to width and length changes without major cost premiums.
When to use it: Irregular lot shapes, parcels with easements or unusual setback geometry, or infill sites where you need to maximize coverage on a constrained footprint.
Type 5
Climate-controlled interior corridor layouts
Climate-controlled storage requires an enclosed building with interior hallways connecting all units. Tenants enter through building access points and walk down conditioned corridors to reach their unit doors. This is fundamentally different from drive-up layouts where each unit opens directly to the outdoors.
Interior corridor buildings are typically wider than drive-up buildings. A 50-foot-wide building supports two rows of 10-foot-deep units with a 5-foot corridor down the center. Larger buildings (60 to 80 feet wide) can accommodate deeper units or double-loaded corridors with wider hallways.
The trade-off is lower space efficiency. Interior corridor buildings convert roughly 72 to 75 percent of gross square footage into net rentable area, compared to 75 to 85 percent for drive-up layouts. The corridor, stairwells (if multi-story), elevator shafts, and building entries all consume floor area. But climate-controlled units command 15 to 30 percent higher rents, which offsets the density loss for most markets.
When to use it: Any facility offering temperature and humidity-controlled storage. Required by design for climate-controlled steel building kits. Common in urban markets, multi-story projects, and areas with high demand for premium storage.

Standard Storage Unit Sizes and Door Widths
Regardless of which floor plan type you choose, the individual units inside the building follow standard storage unit sizes that tenants and operators across the industry expect.
The most common mini storage unit dimensions are listed below. The first number is the door-facing width and the second is the unit depth.
- 5×5 (25 sq ft)
- 5×10 (50 sq ft)
- 5×15 (75 sq ft)
- 10×10 (100 sq ft)
- 10×15 (150 sq ft)
- 10×20 (200 sq ft)
- 10×25 (250 sq ft)
- 10×30 (300 sq ft)
Smaller units (5×5 and 5×10) are popular in urban markets and college towns where tenants store seasonal items, documents, and small household goods. Mid-range units (10×10 and 10×15) are the backbone of most suburban facilities. Larger units (10×20 and above) serve tenants storing furniture, vehicles, equipment, or business inventory.
Door widths matter more than most first-time developers realize. The industry standard minimum is 4 feet, which allows tenants to move furniture, handcarts, and dollies in and out without scraping the door jambs. Units 10 feet wide and larger typically use doors that are 8 to 10 feet wide (matching the full unit width) for drive-up access. Climate-controlled interior corridor units often use 4-foot doors on 5-foot-wide units and 6-foot doors on 10-foot-wide units to conserve hallway clearance.
Roll-up doors should be specified early in the design process because they affect the structural framing above each opening. TruSteel engineers framed openings into the building design so your door hardware installs cleanly without field modifications.
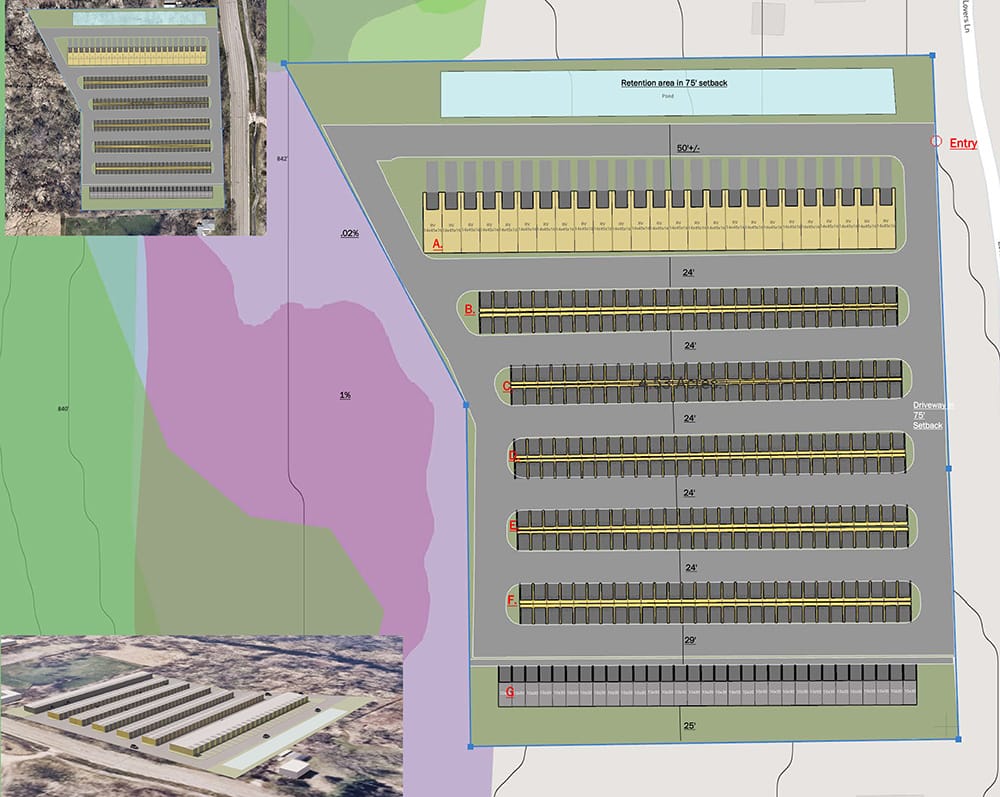
How Building Width Determines Your Storage Unit Layout
The width of your steel building is the single dimension that constrains which unit depth combinations are possible. Understanding the relationship between building width and unit depth is essential for designing an efficient self storage floor plan.
30-foot-wide buildings
A 30-foot building width supports a single row of units up to 25 feet deep (single-slope layout) or two rows of shallow units back-to-back (such as two rows of 10-foot-deep units with wall space). This is a common width for perimeter buildings and single-loaded drive-up rows.
40-foot-wide buildings
The 40-foot width is the most popular mini storage building dimension for back-to-back gable layouts. It cleanly accommodates two rows of 10-foot-deep units with a shared center wall and exterior wall thickness on each side. If you need deeper units on one side, a 40-foot building can also support a 15-foot depth on one row and a shorter depth on the other.
50-foot-wide buildings
A 50-foot building supports two rows of 15-foot-deep units back-to-back (gable layout), or two rows of 10-foot-deep units with a 5-foot interior corridor down the center (climate-controlled layout). This width is the standard starting point for interior corridor climate-controlled buildings and is also a strong choice for facilities that need a higher proportion of deeper units.
Buildings wider than 50 feet are used for larger climate-controlled facilities, multi-story projects, or layouts with wider corridors and deeper unit combinations. TruSteel can engineer mini storage steel building kits to virtually any width your layout requires.
For help calculating how many units a given building size can hold, see our storage unit count calculator and layout guide.

Interior Corridor Design Standards
If you are building a climate-controlled facility with interior corridors, several design standards apply that do not factor into drive-up layouts.
Corridor width
The minimum hallway width for a self-storage interior corridor is 5 feet. This provides enough clearance for tenants to move furniture, boxes, and handcarts without bumping into the opposite wall or other tenants. Some developers widen corridors to 6 feet in facilities that expect heavy move-in and move-out traffic, but the additional width reduces rentable area.
Building entry spacing
Fire codes in most jurisdictions require that no storage unit be more than 150 feet from a building entry or exit. This standard determines how many access points your building needs and where they are placed along the corridor. On a 200-foot-long building, you would typically need entries at both ends and possibly one at the midpoint, depending on your local fire marshal’s interpretation of the code.
Door recessing
Unit doors along interior corridors should be recessed slightly (2 to 4 inches) into the unit opening so that the door, when rolled up, does not protrude into the hallway. This prevents corridor obstruction when multiple tenants are accessing adjacent units at the same time. Recessing is a detail that should be specified during the design phase, not addressed as a field fix during construction.
Drive Aisle Widths and Vehicle Access Standards
For drive-up storage facilities, the space between building rows is just as important as the buildings themselves. Drive aisles need to be wide enough for tenants to comfortably pull up, turn around, and back into their unit with a truck, trailer, or SUV.
The standard drive aisle width for self-storage is 24 to 26 feet. This allows a full-size pickup truck or moving van to make a three-point turn between buildings and back up to a unit door without encroaching on the opposite row. Facilities that expect frequent box truck or trailer traffic should lean toward 26 feet.
Drive aisles that are too narrow create tenant frustration, increase the risk of vehicle damage to building corners and doors, and can trigger fire department access concerns during plan review. Do not try to squeeze extra building rows onto your site by narrowing the aisles below 24 feet.
Site Layout Principles for Mini Storage Floor Plans
Individual building floor plans are only one layer of the overall facility design. How you arrange those buildings on the parcel determines traffic flow, security, drainage, and future expansion capability.
Fortress configuration
The most common and effective site layout for drive-up self-storage is the fortress configuration. Buildings are placed along the perimeter of the parcel with doors facing inward, creating a walled enclosure that naturally limits unauthorized access. The entry gate controls a single access point, and the building back walls serve as the facility’s security barrier.
This layout also simplifies fencing requirements because the buildings themselves form most of the perimeter enclosure.
Stormwater and grading considerations
Storage facility sites need positive drainage away from building doors and drive aisles. Grading the site so water flows toward collection points (swales, retention ponds, or underground systems) without pooling at unit entries is a basic but critical design requirement. Your civil engineer should coordinate drainage with building placement early in the design process.
Building orientation
In cold climates, orienting buildings so that unit doors face south or east reduces the accumulation of snow and ice on door tracks and thresholds. North-facing doors receive less direct sunlight and stay colder longer during winter, which can create ice problems for tenants and increase maintenance for operators. An east-west building orientation with doors facing south is the preferred configuration where snow and ice are a concern.
In hot climates, orientation matters less for door operations but can affect cooling loads on climate-controlled buildings. Minimizing western sun exposure on the longest building faces reduces heat gain and HVAC operating costs.
Designing Your Floor Plan around Your Market
Your floor plan should follow your unit mix strategy, not the other way around. Start by researching what unit sizes your market demands, then select the building widths, depths, and layout types that deliver that mix most efficiently on your specific parcel.
TruSteel provides mini storage steel building kits engineered to your exact layout and dimensions, with county-specific stamped building and foundation plans included. Whether you are building a single 30×100 drive-up row or a multi-building campus with climate-controlled interior corridor buildings, we can design the building package around your floor plan.
If you have a zip code, a target footprint, and a rough layout concept, you are ready to start. Contact TruSteel Buildings today for a free quote!